A compressor is a tool that we use to control the dynamic range of our source. With our recorded sound we have RMS & peak. RMS is our continuous level. Peak is our initial transient - the loudest part in our sound wave. We use compressors to attenuate the difference between the peak transients and the RMS continuous volume. Doing this means we have a much more even sound. The quieter parts of our mix are brought up to almost the same level as our peaks. For example, if we have a snare drum with big hits followed by little ghost notes, we’re effectively bringing up the volume of the ghost notes by turning down the volume of our big hits and then turning the whole thing up. We end up with much less difference between the quieter hits and the big hits. This is useful because in a mix where there is a lot happening, all of the detailed parts can get lost, so we’re able to bring them up by simply reducing the dynamic range.

Using a shaker track as an example, you can see from the waveforms that we've got some very strong hits that are on the beats and some quieter notes in between. It might be that in the mix, these quieter notes are getting lost. So what we want to do is have the effect of turning the quieter notes up so that we get a nice rhythm that cuts through the entire mix. To do that we're going to use a compressor.

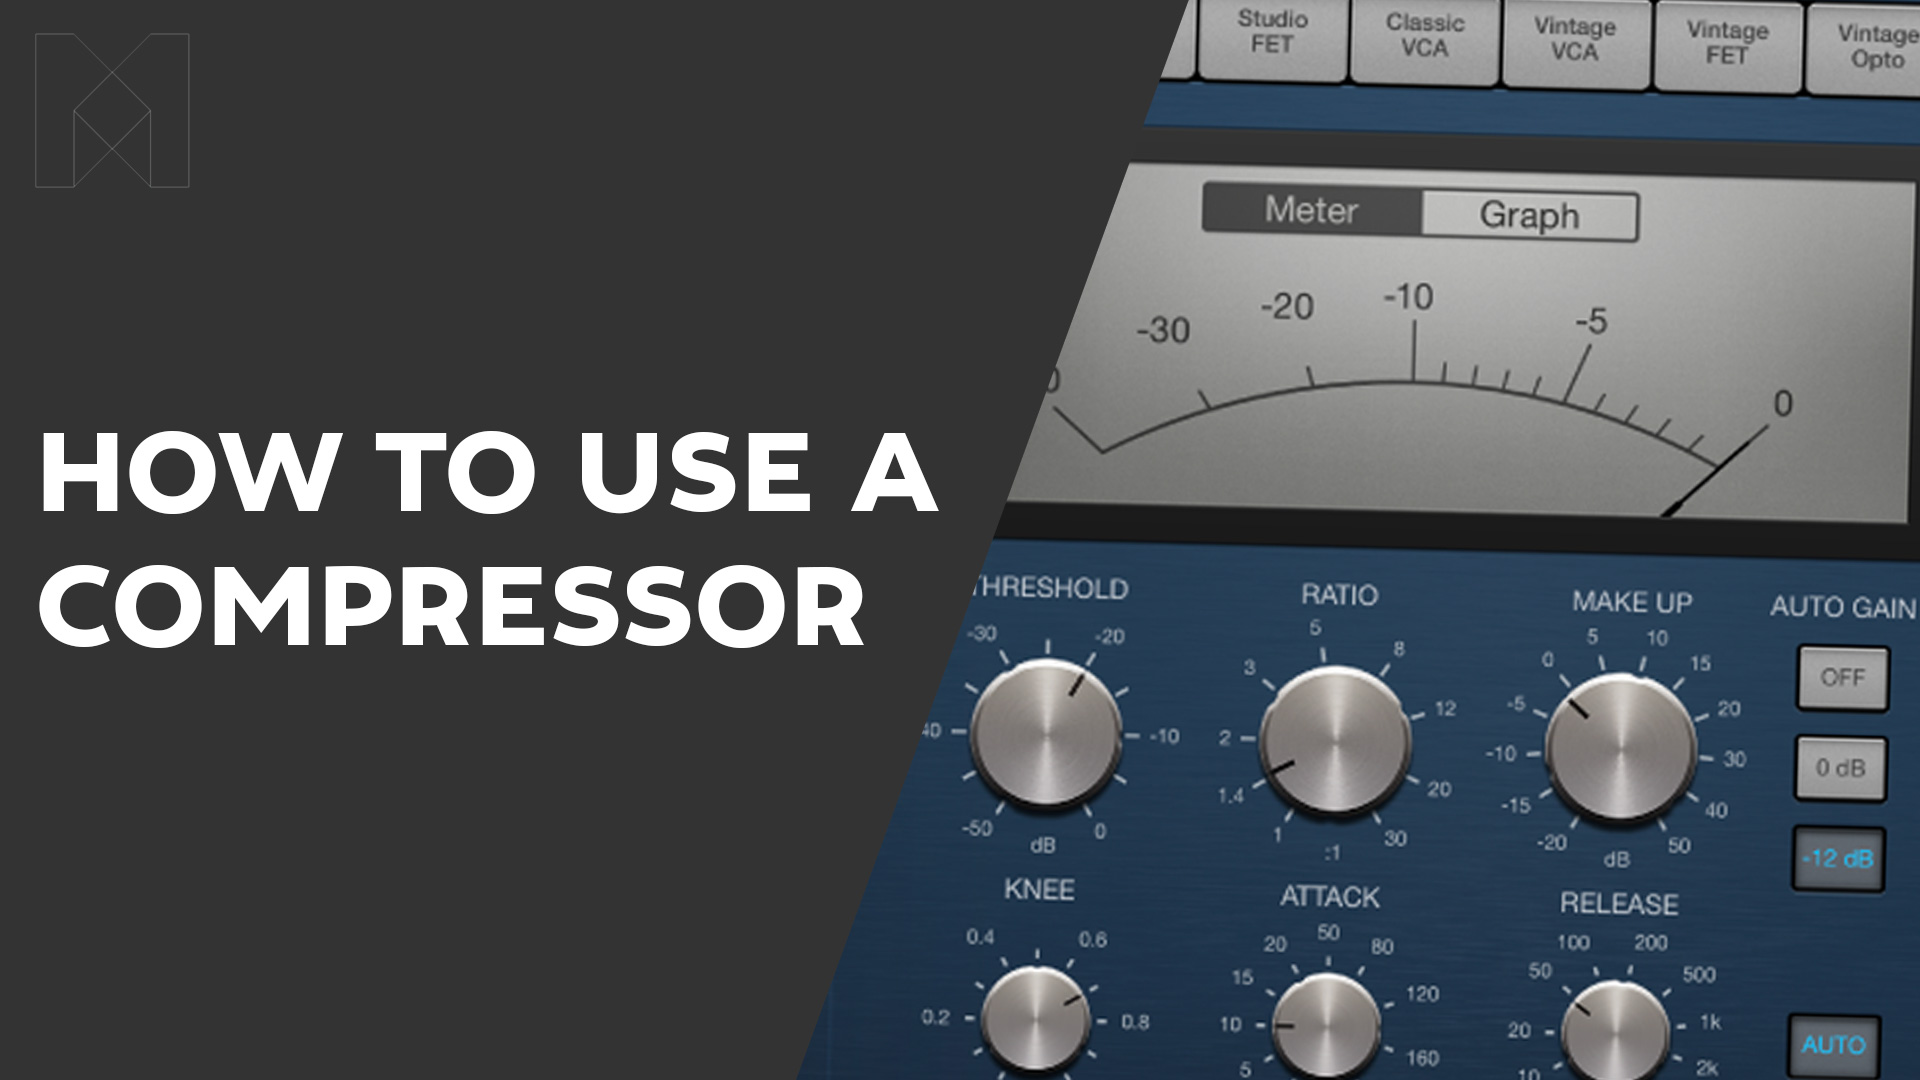
This is the default compressor in Logic, and its layout is pretty standard. Let's go through the controls.
Over on the left, the Input Gain controls the signal hitting the compressor. You can hit the compressor harder or softer by turning it up or down. If you're working with a particularly quiet source, you might need to turn the gain up to get a stronger signal to come into the compressor.
The Threshold controls the decibel area that we are going to have the compressor react to. At this setting, the compressor isn't going to compress anything until it goes above -43dB.
The Ratio controls how many decibels are going to be attenuated or turned down for every decibel over our Threshold. At 2:1, for every 2 decibels over our Threshold of -43dB, our source is going to be turned down by 1dB.
The Make Up Gain affects the overall volume of the compressed signal, once we've turned down the volume of our peaks. We use this to bring the whole level of the compressed track back to around where it was originally. This has the effect of turning up the volume of those quieter notes to be a similar volume to our louder notes.
The Knee affects the curve or shape of the compressor. You can use this to smooth things out or make them a bit more harsh with this control.
The Attack is the amount of time it is going to take before the compressor starts reacting, based on the parameters we've set with our Threshold and Ratio. As soon as we've gone over our Threshold of -43dB, we're going to wait 2.5ms before the compressor starts to apply our Ratio. The reason we set this at something like 2.5ms is just to let a little bit of that initial transient attack come through so that in this case, with our shaker playing on and off the beat, it still has a pulse and sounds natural.
The Release is how long the compression is going to tail off for. At 77ms, our compressor is going to roll off quite slowly. Changing this will affect how natural your compressor sounds.
The Limiter section of the compressor over on the right is used slightly differently, and this is a topic that we will cover in more detail when we speak about Mastering. Not all compressor plugins have a limiter. Limiters are different to compressors in that instead of pulling down the level of our transients, we set a threshold and turn the volume up, and the limiter won't allow anything to go above a certain threshold. It will simply chop the top off of everything.
The trick with using a compressor is finding the right balance between having the dynamic range where you want it to be but also not starting to bring up the volume of unwanted noises such as the noise floor of the microphone or any bleed from any other sounds happening during the recording.
How to side-chain a compressor

Using a bass track, we can set up a side-chained compressor. To get set up we have one track with our clean bass DI and another track with our affected drive sound. Both of the outputs of these tracks are configured to send to a bus called "BASS BUS". On this bus, we can apply a compressor.

This is where we can use our side chain input. We are going to set the side chain to come from our Kick channel, which in our case is the Audio 4 track. What this is going to do is instead of setting a Threshold trigger, like we did in the Compressor guide, the compressor is only going to be applied when it receives a signal from the side chain input, in our case the Kick channel. So in this configuration, our kick drum is triggering the compressor. The reason for doing this is that we want to make sure that the kick always sounds nice and punchy in the mix, and because the bass takes up a lot of the same frequency areas as the kick drum, we want to duck the bass out a bit every time that the kick happens, just to make space for the kick drum to breathe in the mix.
In these settings, the compressor is configured to have a slow release time so that there is plenty of time for the kick drum to decay. The attack is reasonably fast, but not so fast that we lose the initial finger sound when the bass is being played. And the overall signal is being turned down quite a lot to ensure there is enough of a volume dip for the kick drum to come through.
Overall this is quite a subtle change, but it is a very useful tool to help keep headroom in your mix and clear things up.
Compressors are fantastic and extremely versatile, and you will use them a lot in your mixes. However, you want to make sure that you don't rely on them to create your mix by levelling the whole thing out. Your mix needs to come from your faders and your automation.
If you slam a compressor it does get a cool sound, and it can be a great effect, but if you start to rely on compressors to do the mix for you, you are only going to end up with a mix that you don't like. Be gentle with it (unless you're going to use it as an effect for a certain part) and work on bringing out the subtleties of your mix!
Sign up for our Music Production course